Making Pandemic-proof Theatre
This post is about the video processing and distribution side of a recent live-streamed stage production To Be A Machine, and its new German-language Austrian version Die Maschine in Mir. In a future post, I’ll go into more detail about the cameras, video capture and live-streaming.
If a live-streamed theatre production about Transhumanism that uses 100+ iPads with custom app and media distribution server, an automated video processing pipeline hacked together with Python, FFmpeg and some off-the-shelf web apps, all developed in a couple of months during a pandemic sounds interesting to you, then read on!
This was my only live theatre project that wasn’t cancelled in 2020. It went ahead because of clever, reactive writing, careful planning and liberal use of tools and technology.
2020 was not the year to expect work in theatre, yet somehow along came To Be A Machine (version 1.0) in August. A clever stage adaptation by Dead Centre of Mark O'Connell’s 2017 non-fiction book that The Guardian described as “a captivating exploration of transhumanism features cryonics, cyborgs, immortality and the hubris of Silicon Valley.”
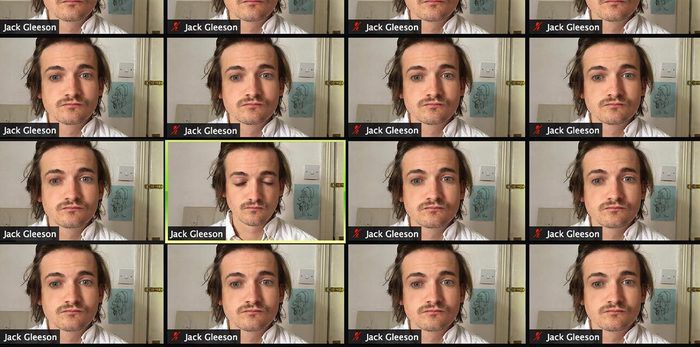
Ben and Bush - the directors of theatre company Dead Centre - had originally planned for this to be a simple work-in-progress presentation for a live audience in the 2020 Dublin Theatre Festival. However, the rolling lock-downs and blanket cancellations of live-events, made planning for an in-person audience difficult and highly risky. Instead, Dead Centre quickly adapted their text, weaving the pandemic into the background, and introducing the idea of a disembodied audience of iPads, displaying video clips of each individual ticket holder.
The inspired casting of Jack Gleeson (actor and theatre-maker, known for playing King Joffrey in GoT), added additional thematic layers of actors being machines, and the death of characters they play.
Read more about the origins of the piece in this Guardian interview with Mark O'Connell and Jack Gleeson.
Pre-production and rehearsal #
While Ben and Bush re-worked the text, I started researching the technical challenges and potential solutions. We met frequently over video calls to share findings and discover details. During this time, the key requirements quickly emerged.
An audience of tablets #
We felt that 100 tablets on stands in a theatre seating bank would feel like an audience, plus it’s a nice round number that sounds impressive but not unwieldy! We’d need a way to quickly load that days audience on them. We also needed to be able to individually control them live, ideally using show-control software and a standard protocol like OSC. We didn’t want to see cables, so they’d need to have decent battery life to last for at least an hour at full screen intensity. We ended up choosing iPads, more later.
Video uploading and processing #
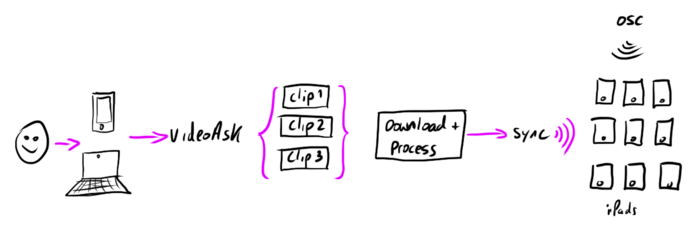
We needed an easy, and ideally guided way, for ticket holders to upload videos of themselves. We also needed a method of linking their uploads to their ticket booking reference, and a pipeline to moderate their uploads, process them and get them onto their individual iPads. We briefly discussed how we might do actual live feeds of all 100 audience members, but quickly ruled it out for obvious technical reasons and time constraints. Interestingly, we would later be glad that this wasn’t technically feasible, as live audience faces on screens would have been very distracting for the audience, and actually not be as well suited thematically to the production - particularly the piece around mind-uploading and Ray Kurzweil. After lots of research and testing I chose the excellent service VideoAsk as the user-facing upload app. Zapier formed a ‘no-code’ bridge to Google Sheets, with Python and FFmpeg for the download and processing pipeline. More on all this later below.
A stage display #
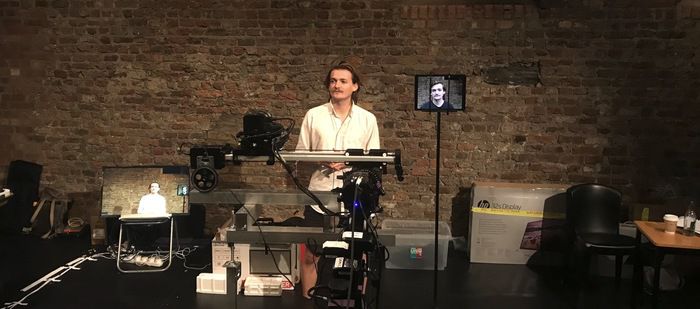
The story called for a video display beside the actor, displaying content that a camera would dolly in and out of. This display needed to look good on camera, be completely wireless as it needed to fall off its stand at one point. We needed to be able to wirelessly control the media it displayed. It needed to be high enough resolution that it still looked sharp when it filled the camera frame. It needed to have a high enough refresh rate to not flicker on a camera at 25fps. We chose an iPad Pro running Keynote, more on this below.
Main camera #
The main camera needed to be rigged so that it could move smoothly from a wide shot of actor and stage iPad, to an extreme close up of actor OR iPad, and anywhere in between. This meant we needed linear motion on two axes - upstage / downstage to push in and out, and left / right to move between actor’s face and iPad pro. The ultimate solution would be a custom dolly on 6m of cine-track, a remote-controlled motorised slider, and motorised focus control for pulling focus during dolly moves. More on this in a future post.
Video capture, streaming and recording #
The last key requirement of the video tech solution, was the live video capture, cueing and streaming. Sound designer Kevin Gleeson and I had already decided on QLab as the media server and show control software. This is a no-brainer really for small to mid-size productions these days. QLab is easy to use, powerful, reliable and cheap! Once you’ve verified it can do what you need of course. It’s a shame it’s Mac only. The requirements of QLab were - capturing the HD video streams from live cameras, switch between live cams and pre-recorded content and to stream the output from QLab to Vimeo, our chosen live streaming platform.
We used the amazing Syphon to soft-pipe video into OBS, and streamed to Vimeo from there. I also decided to use Black Syphon as a virtual syphon client, so that together with Syphon Recorder, we could record from the live cameras for glorious direct-to-disk recording. More on all this in a future post.
Production #
To give you an idea of how quickly things had to happen, I first heard about the idea for the production at the end of June 2020, we had our requirements down and some testing done by the end of July, the bulk of equipment purchasing and iPads hired by August and we were rehearsing with the camera solution and custom iPad app by September. The first live performance was on the 1st of October.
By the end of August, here’s where things were at technically.
Audience iPads and app #
The decision to go with iPads over Android was down to a number of factors.
- I had contacted Zac, an iOS developer pal that I knew from our time at startup Drop, and he was interested in working on an app for the show.
- iPads were easy to hire in bulk - it’s clear Apple has done well here in appealing to schools, conference centres etc. Consequently, AV hire companies have lots of them.
- given the short amount of time to research, iPads seemed a safer bet for durational installation and in-camera use e.g. battery life, screen refresh rates, fine-grained control of notifications, data, network etc. and ability to flash profiles using Apple Configurator 2. However I would like to spend time exploring other options for next time, because some things like app distribution were not exactly straightforward.
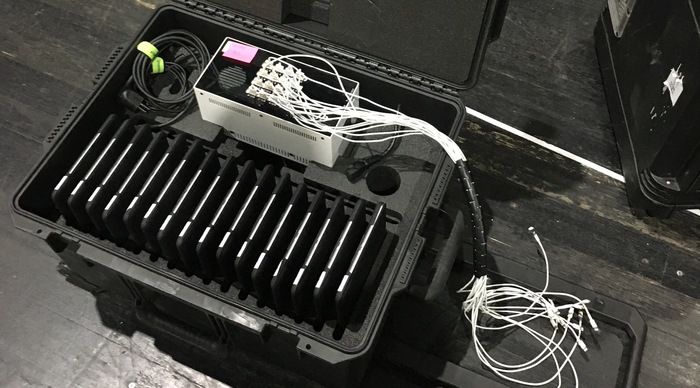
The iPads arrived in very satisfying flight-cases with built in charging. Brand is Multicharge if anyone’s interested.
iOS app and content distribution. #
Surprisingly, I couldn’t find a simple, cheap / free iOS app that could play stills and video fullscreen and receive remote control commands via OSC*. So Zac and I built one to a basic MVP definition:
- look for a Bonjour service on the network
- request any data for this iPad’s name
- wait for and respond to valid OSC commands
- play video [name] [loop type] [dissolve time]
- stop all
- sync - this allowed us to update the content on specific iPads by name / IP
*I did find a couple of things like MultiVid but as far as I could tell, you couldn’t trigger different clips on each device simultaneously. There’s also PixelBrix that immediately put me off due to lack of pricing etc. Plus, we didn’t need anything fancy like frame-sync.
The sever is a Node.js app running locally, exposed as a discoverable Bonjour service for file syncing. It also supports a non Bonjour backup mode that requires a pre-built list of device names and IPs.
Audience video uploading via VideoAsk #
VideoAsk is a new product from the makers of TypeForm. It’s essentially forms through video, where questions can be presented by the form maker as video, and responders can answer with video, audio, text or multiple choice, depending on the nature of the question. It can also be used as a sort of asynchronous video chat for customer support.
I’m pretty confident we were not using VideoAsk in a way it was intended! Yet, it provided the perfect tool for us to provide simple, guided video acquisition, while also giving the audience a taste of the production they would soon experience.
Jack Gleeson guiding me through uploading myself from my poorly lit kitchen.
While we’re not talking about huge amounts of data here, with 110 ‘seats’ over 9 performances in the first run, it did add up to 2970 clips. Not insignificant, especially considering it being video. The worse-case fallback would be for people to record videos on their phones and send them to us somehow. But think of how much could go wrong?!
- how do we communicate what we needed from uploaders?
- will the video file sizes be small enough to attach to an email? unlikely. If not, then what service should we use to upload
- how can we be sure the person records enough video but not too much? We only need a small amount to make a seamless loop.
I couldn’t believe my luck when I found VideoAsk. It’s that thing that never happens - you find a tool during a deep, super-specific search - and somehow, it ticks every single box. Right down to being able to specify how long the user can record a video for. The key features we made use of:
- video questions - but instead of questions, we were giving instructions
- video answers - VideoAsk handles camera and mic permissions, various platforms, compression uploading and hosting
- variables - VideoAsk supports data being passed to it via hidden fields. We used this at The Burg theatre in Austria to pass booking refs in individual URLs
- white-labelling - the paid accounts allow for full custom branding, including URL, colours, logo, language, labels etc.
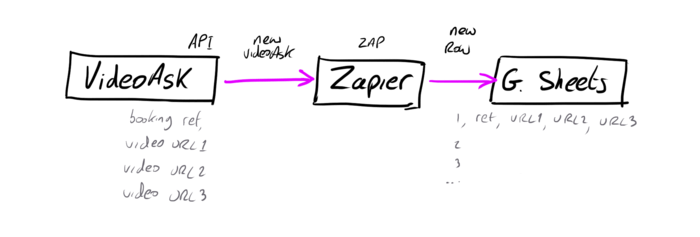
- API - I made use of VideoAsk’s API using Zapier to create new spreadsheet rows for each new VideoAsk submission.
I registered a custom domain and SSL cert and set a CNAME entry to use a subdomain (upload.tobeamachine.com) to give the URL more meaning.
VideoAsk compresses* and stores hosts the uploaded videos. Next up, downloading and processing.
*The compression is very aggressive and not adjustable. The first second or two of most clips had even heavier compression, my guess is it was the variable bitrate algorithm getting a ‘feel’ for the material. While the heavy compression actually suited us aesthetically, it might not be ideal for other purposes.
Data prep with Zapier and Google Sheets #
The above flow is is great example of how no-code cloud offerings can really help with the rapid development of a prototype or, in our case, a final solution to a temporary production. The joy of theatre is that technology solutions normally don’t need to scale much or last for a long time, so often the prototype does the trick.
With the zap tested and running, each new VideoAsk submission resulted in a new spreadsheet row with the booking ref number, and URLs to the three uploaded videos. We ended up using the spreadsheet to do all our data cleansing and video moderation - the perfect, minimalist content management tool. One handy thing was highlighting duplicate reference numbers, as people sometimes re-uploaded, or took a few attempts to figure it out. I used this formula to highlight duplicates in a sheet.
We were able to view the videos directly via the spreadsheet URLs by enabling VideoAsk’s ‘sharing’ option, which makes videos public if you have the direct link.
Video downloading and processing with Python and FFmpeg #
The morning of each performance, I used a basic script to download the set of clips for each audience member for that evening’s performance. The three videos were stored in a directory named using the booking reference number. Processing uploads on the day of each performance meant audience members could upload their videos right up the the night before their particular show. With some more improvements to the automation of processing, there’s no reason why uploads couldn’t happen right up to the performance itself - something for next time.
The audience laughs.
Next came preparing the clips for the iPads. Since clips were short by design, I knew it would be good to make a seamless loop out of each, to minimise distracting loop jumps. The iPads were all going to be in portrait too, so some landscape uploads would need to be cropped. Finally, we didn’t want the audio to play from the iPads, so the easiest thing was to strip any audio frmo the videos. For all this, I used the excellent ffmpeg-python wrapper by Github user kkroening.
I love FFmpeg, it has dug me out of more video holes than I can remember, but it can be tricky to think about it clearly from the command line. I find using it with through Python, much easier and makes for a friendlier way to share the code with others.
To make the seamless loop, I simply made a palindrome loop by duplicating and reversing each video and appending this to the original. I wanted to trim the start from each video to skip passed the heavy compression I mentioned above. ffmpeg-python made it easy to build this compound process in a very readable style, especially important for someone like me that doesn’t code very much.
This is the function I used to do all this.
def processInput(in_stream, out_path, start, end, x, y, width, height):

    print("Processing " + in_stream)
    input = ffmpeg.input(in_stream)
    (
        ffmpeg
        .trim(input, start_frame=start, end_frame=end)
        .concat(input.filter('reverse')
            .trim(start_frame=start, end_frame=end))
        .crop(x, y, width, height)
        .output(output_path)
        .run()
    )
For cropping, I first used FFprobe to get the video dimensions using a function based on this gist by Github user Oldo which runs FFprobe as a subprocess and converts the returned data to JSON. Then cropped any landscape video to fit a portrait iPad.
There were a few more scripts that handled the following:
- rename each audience directory to a destination iPad name for file syncing
- create an empty text file named using the booking reference in case we need to identify the content in each directory later
- duplicate unprocessed landscape clips for additional content used fullscreen during the live show
If you’re interested in learning some Python to automate this kind of boring stuff, I recommend the superbly named Automate the Boring Stuff with Python, a Free to read under a Creative Commons license book by Al Sweigart.
Conclusion #
To Be A Machine ended up having three outings in 2020 - Dublin Ireland, Liège Belgium - albeit streamed from Belfast Ireland because of travel restrictions, and The Burg theatre in Vienna, Austria. Thematically, it echoed with the times, and with a virtual audience, theatres were more confident in booking it knowing it was less likely to be cancelled. Additionally, with so many cancelled productions, theatres had many slots to fill. Technically, the single actor, small crew and mostly wireless operation of all the technical elements made social-distancing possible, and greatly reduced the physical contact required with equipment. The direct-to-disk recording enabled by Syphon and Syphon recorder meant we could shoot our pre-recorded elements without exchanging physical media.
In a follow-up to this post, I’ll write more about the camera setups, the video capture / recording and streaming. Also, my website will cover more of the video design aspects of my work on this soon too.
Above, direct-to-media server recording over SDI using Syphon Recorder, wireless focus pulling and iPad audience control from QLab using OSC and a Python OSC bridge.

