Guide: Live-Streaming for Performance-Makers
This detailed guide shows you a tried and trusted way to live-stream theatre, dance opera etc. performances that is low-cost and high-quality. Some of what is covered here is Mac specific - namely the use of QLab for playback and queuing; and Syphon - an app that we’ll use to share video between applications. We’ll use OBS (Open Broadcaster Software) for streaming which is a brilliant option for budget constrained productions.
While this guide is technical in nature, it is aimed at the not-very-technical (we’re all at least a bit technical these days) and aims to cover everything you need to know to live-stream a basic production.
You’ll be able to follow along with the video parts of this guide using just the webcam of your Mac. You will also need a QLab video license once we get there, although you can rent one for 24hrs for $4 (see below).
📺 We’ll be testing your live-stream using YouTube later in the guide. They have a policy of not allowing you to stream for 24 hours after enabling live-streaming on your account. So maybe start this process now if you want to get streaming ASAP.
This material is based on a workshop I held with Kevin Glesson with Dublin-based theatre company Dead Centre, which in turn is based directly on our experience of live-streaming 28 performances (as of Feb 2021) of To Be A Machine for Dublin Theatre Festival, Théâtre de Liège and Burgtheater Vienna’s German language version, Die Maschine in Mir. The workshop was supported by The Arts Council of Ireland and Dublin Fringe Festival.
Overview #
We’ll go step-by-step through setting QLab up to work with professional video cameras, and using OBS (Open Broadcaster Software) to stream to YouTube. Then we’ll cover how to add high-quality audio acquision to the setup. Finally we’ll also cover topics like reliability, internet connection and using multiple cameras.
This guide is detailed with lots of images and screenshots. This makes it seem long! But hopefully the layout will help you find what you need quickly.
QLab is normally used to playback pre-recorded sound and video using a stage-centric cue-based interface, with sound heading out of the computer to a PA system, and video going to projectors, screens, LED walls etc. on stage.
In order to live-stream a performance, we first need to film it on camera and acquire that live video signal at a reasonably high quality. We also need to capture sound from either the camera mic, or a separate mic e.g. a wireless lapel mic on a performer. We’ll look at that too.
Capturing high-quality video #
You’ve probably noticed the poor picture quality from cameras that are either part of your computer (your webcam) or that can plug directly into your computer, e.g. a USB webcam. They are compact, cheap cameras designed with the reasonable assumption that they’d be used for video calls and the like. Since video chat apps heavily compress video to reduce bandwidth, there’s never been much need for high-quality webcams.
Video cameras #
👩🏽💻 while this guide details how to capture video from an external video camera with a video capture device, you can follow along and test with just your webcam. Then later, if you get your hands on a camera and capture device, you can switch to those and refer back to here then.
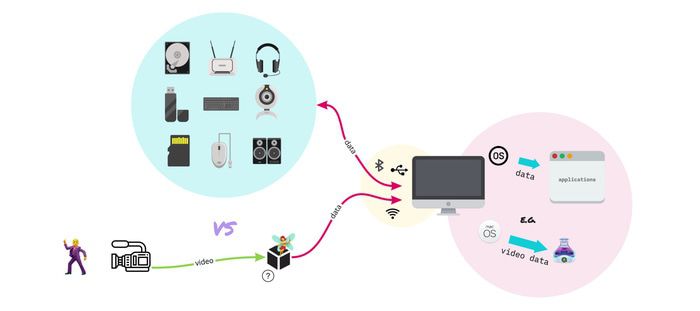
To do justice to your production, you’ll want to use a professional / ish video camera. However these generally can’t be plugged directly into your computer as it doesn’t have a way to read the video signal that the camera produces. The reason a USB webcam can be plugged in directly is because it converts a video-signal into a format your computer can use directly, in tandem with some software that’s part of the operating system. The OS then makes this video data available to applications that want it, e.g. Zoom, QLab, FaceTime etc.
🛒 the topic of video cameras could occupy another separate guide, so I’ll just give you a couple of very high level pointers based on whether you already have a camera and want to know if you can use it, or you’re looking to rent / buy one:
- You: I already have a camera! Me: Does it have a HDMI or SDI output? If so, then you’re good to go*.
- You: I’m thinking about buying a camera! Me: Make sure it has a HDMI and / or SDI output then you’re good to go and the rest is up to you*.
Cable: you will also need a HDMI cable to go from camera to capture device. If your camera has a mini-HDMI port, you will need a mini-HDMI to HDMI adapter. While this is fine for testing, and possibly even basic production, you’ll likely need a way to send your video signal from stage to the wings / control room without using a HDMI cable. I’ll cover this at end of the guide in the on-stage section.
*this means nothing re. the overall quality of the camera, just that it’s most likely HD and can be used with the approach in this guide.
In the above diagram, you’ll notice a little box sitting between the camera and computer that isn’t needed by the general peripherals (mouse, keyboard, webcam etc.) This is a video capture device and is a key part in producing a high-quality live stream. There are many brands and types, depending on what camera and computer you have, and what your budget is. In this guide we’ll focus on a low-cost (~€110) professional capture device from Blackmagic, the UltraStudio Recorder 3G*. I’ve used these on many productions, and while they can be tricky to setup sometimes - more on this later - they’ve been rock-solid otherwise.
*replaces the older UltraStudio Mini Recorder, not supported anymore.
🛒 You can get it locally in Dublin from Camerakit, EU: Thomann, US: B&H Photo QLab included this device in its list of supported devices, have a look here. If you read their list in detail, it’s clear that Blackmagic devices are the only real option for HD video. NB: The device does not include a Thunderbolt 3 (USB-C) cable, so you need to have / get one of these too.
⚠️ the UltraStudio Recorder 3G requires a Mac with Thunderbolt™ 3 USB-C port. Check this page to see if your Mac has one.
🙁 If your Mac has the older Thunderbolt 2 ports then you can’t - as far as I can tell - use this device, even with an adapter. However, you can try and purchase the older, discontinued UltraStudio Mini Recorder, which is Thunderbolt 2. Hassle, I know.
To use the UltraStudio recorder with your Mac, you’ll need to download the Desktop Video application from Blackmagic website’s support section. It’s a confusing downloads area so: scroll down to latest downloads, then scroll within latest downloads until you find Desktop Video, download* the Mac version and install.
*Tip: don’t waste time filling out the download form, there’s a ‘download only’ link under the form 👍🏼
⚙️ Note on installing Desktop Video
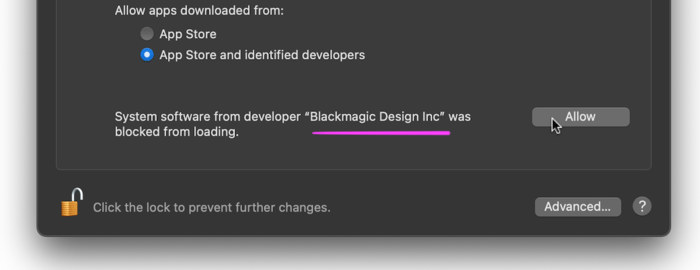
Make sure to allow System software from developer “Blackmagic Design Inc” in System Preferences > Security & Privacy > General, and restart your computer (twice in total I think), or it won’t work.
Secret sauce #
Now, in theory, we’re ready to plug in a video camera and start seeing a video feed in QLab, but I’d highly recommend one more step that will make life much easier later. I’m not sure where the fault lies, but for some reason, the interface through which you select the video capture device in QLab is opaque and unpredictable. This might be QLab’s problem, or it could be Blackmagic’s - in the way Desktop Video app presents itself and its devices to QLab).
While they squabble over whose fault it is, we’ll sneak off and install a software tool called Black Syphon by VJ software maker VidVox. While it sounds like a piece of equipment from a pirate ship, it is actually an excellent free, open-source piece of magic that serves as an intermediate between Desktop Video and QLab.
Not only does it make selecting the capture device within QLab easier and predictable, it allows you to simultaneously use your camera feed with other applications, something that isn’t possible otherwise. One example being to record video from your camera, directly to your computer even while QLab is consuming the same feed.
In other words, Black Syphon is acting as a sort of software video splitter. It uses Syphon, a tool we will use later to share video from QLab to OBS. For now, download and install Black Syphon.
If you’re using your webcam for now, you won’t need Black Syphon or a video capture device.
Testing video capture with QLab #
👩🏽💻 If you’re following along with just a webcam for now, you can skip this bit move on to the QLab section.
You’ll need to rent / buy a QLab video license, even one day for $4 will do for learning / testing.
Assuming you’ve got this far, and have a working camera, let’s check for a video feed:
- with Desktop Video installed and open, plug in the UltraStudio Recorder. You should see the device appear in the Desktop Video app.
- connect your camera to the HDMI port on the UltraStudio Recorder, turn your camera on. (depending on your camera, you might need to enable the HDMI output from within the menu system)
- launch Black Syphon, select the UltraStudio Recorder from the potential inputs list, then click on Detect Input Mode. This selects the best option and saves you hassle if you do this within QLab. The option will likely be 1080p25, which means full HD (1920x1080) at 25 FPS which is the best framerate for most circumstances, you have a good reason to use a different framerate.
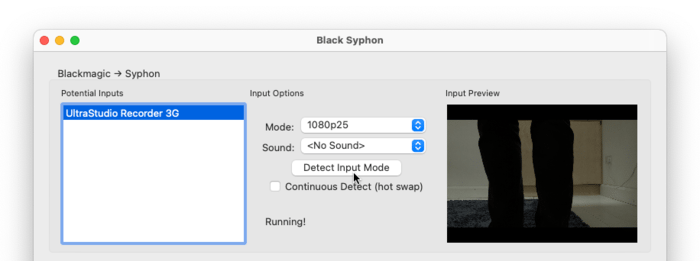
A lovely preview of my legs. My camera is on the floor.
All going well, you should immediately see your live feed in the input preview window. Now we’re ready to get this into QLab.
🛠 If you don’t see anything, carefully go back though all the steps, make sure you’ve OK’d the application running in MacOS (accept when the OS security pop-up appears). Check that a video signal is being sent from your camera by plugging the HDMI cable directly into a HD TV and select the relevant input on the TV / monitor.
Setting up QLab #
Although you can do some of this without a QLab video license, you will need one to output video over Syphon shortly, so it’s worth getting one now if you’re following along. If you select the video option only, you can rent a license for as little as $4 per day
Note how each rental contributes towards a full license, this is a super nice payment model that I wish more other paid applications would adopt.
QLab Camera Cue
- Make sure Desktop Video and Black Syphon are running (you can minimise them if you wish, just don’t close them).
- no need if you’re just using your webcam for now.
- Download and install QLab. Run it and install your license, then create a new workspace.
- Add a camera cue by clicking on the camera icon in the toolbar. MacOS might ask you to approve camera permissions at some point, accept. If you’re on a Macbook or an iMac, make sure that new camera cue is selected in the list, and hit the space bar, you should immediately see a video feed from your Mac’s webcam that fills your screen.
Press ESC key to stop all cues and return to your desktop.
This is using the default camera option, which is your webcam if you have one. If you’re using your fancy new capture device, do the following:
- open QLab settings (cog icon on bottom-right), select video from the list on the left.

at the bottom you’ll see the Camera Patch list, set the first row to the Black Syphon input, and set all other rows to no device for simplicity.

then close settings by hitting done, and return to the cue list view
make sure the camera cue is selected
open the Display & Geometry tab in the inspector (menu > view > Inspector if you can’t see it)
select the Black Syphon option from the Camera drop down list

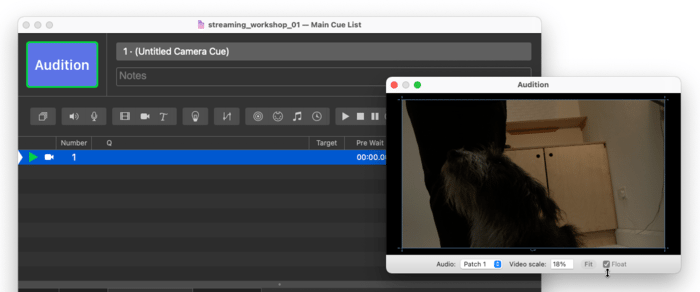
open the audition window (menu > window > audition window), this enables you to see the camera feed without it taking over your entire screen.
Now run the cue again, and this time you should see the feed from the camera connected to the UltraStudio Recorder within the QLab Audition Window. While the cue is running, bring Black Syphon to the foreground, you can still see the feed in the preview window. Hit the fit button on the audition window to fit the video frame to your audition window.
Press the ESC key to stop all cues.
We’ll come back to video later when we look at setting up displays and surfaces for sharing output to OBS (for streaming). First, let’s take a look a how to get a live mic feed into QLab.
Configuring QLab to share video to OBS #
We’ve briefly tested our live video feed using QLab’s audition window. The audition window lets you preview QLab’s video output on your primary display - i.e. not an external display. This is not only useful for when you want to get some plotting done but don’t have an external display to hand, but it also let’s you do some work in QLab without a video license.
Syphon #
With the help of the fantastic Syphon (no downloads required *), we’re going to send QLab’s video output to OBS. Think of it as sort of like using a virtual cable to route video from one application to another, without the video having to leave your computer.
* We don’t need to download anything to make Syphon work. It’s not a standalone application, but rather a service that software developers can choose to integrate into their packages to avail of this video sharing. Thankfully, both QLab and OBS have done so.
Let’s configure QLab to use Syphon.
Open QLab settings (cog icon on bottom right of main window) and select video from the list on the left, you should see something like this:

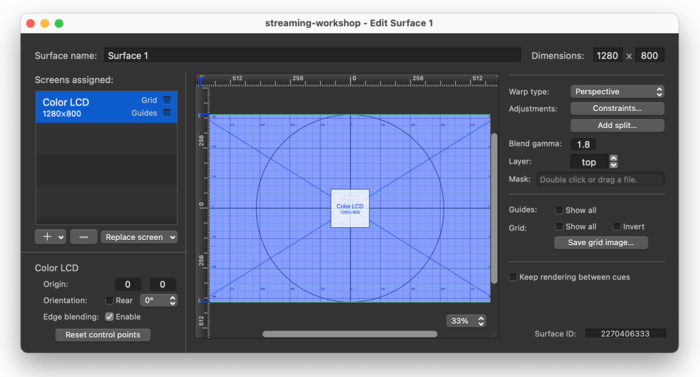
In QLab, a surface is an abstract video output. Abstract because you can create a surface without necessarily having a physical display, like a projector, connected to it. In a new empty workspace, QLab creates a single surface for us, that has a physical display assigned to it - in most cases, this will be the main display of your Mac*.
*This is why video appeared on your main screen earlier, before we used the audition window. In general, you don’t really want this behaviour, unless you’re using a MacBook as a functioning stage prop etc.
We could create a new display using the + button on this screen, but instead we’ll just edit the existing one, so hit edit for Surface 1. This opens the Edit Surface window.
Here, we’ll do three things:
- rename the surface to something meaningful, in this case let’s use to_OBS (the software we’re sending QLab’s output to)
- since we don’t want video going to our Mac’s own display, let’s remove that physical display from our OBS surface - select the only screen in the list labelled Screens assigned on the left, then press the – button underneath. This list should now be empty.
- finally, let’s make this surface a virtual output by adding Syphon as a ‘screen’ - press the + button, choose Syphon.
Groovy! Now QLab is immediately broadcasting this Syphon surface to any interested applications on your computer, e.g. OBS.
But first, one last thing, let’s make sure we’re actually sending some video to our surface, otherwise we’ll only see black in OBS.
Close the Surface Editor and select your camera cue. In the Display & Geometry tab, just note that the Video Surface for this cue has now changed to reflect the edits we made. If you made a new surface intead of editing the existing one, you would just select it here.

You can always use your built-in webcam for testing as I’ve done here.
Now, make sure the audition window is closed this time, and run the camera cue. You won’t see anything, because we removed any physical display from this surface, and the audition window is closed. However, QLab is sending video to Syphon, hiding in the background.
Setting up OBS to use QLab as a source #
First, make sure you’ve installed OBS 😬
On this, OBS asks for some permissions etc. from your Mac, you might need to put in your password etc. usual stuff. Just take your time, so OBS isn’t blocked somehow.
Open Broadcaster Software is free, open-source software and it’s amazing because of this and for how well it works. However, as with much other open-source software, the UI can be a bit clumsy / behind-the-times, this down always down to resources and the focus of the developers who maintain it for us for free. If you end up using it, please consider contributing to the project.
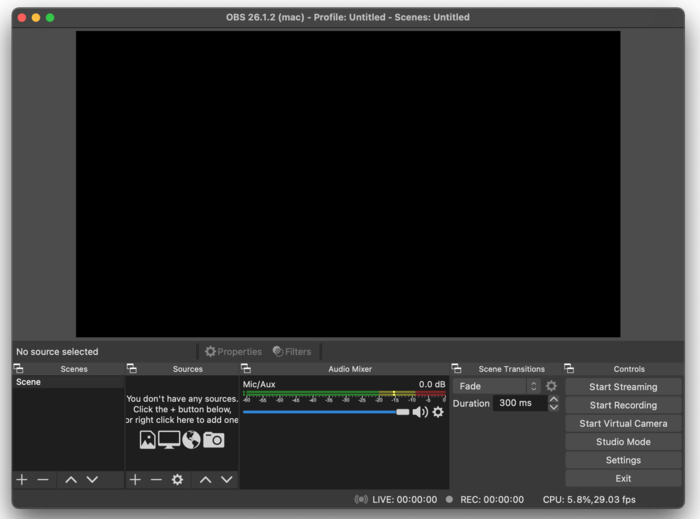
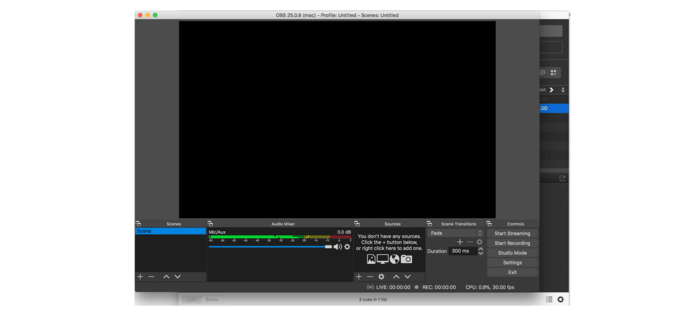
When you first open OBS, just skip / cancel the initial wizard asking for setup info. You’ll arrive at this:
Let’s get our QLab feed coming in:
- hit the + button under sources, choose Syphon Client
- leave it at Create new and rename it to something meaningful, like QLab, press OK
- in the window that opens, select our surface name from the Sources dropdown ([Qlab] to_OBS), you should immediately see your camera feed in the preview window. Easy! If you don’t, make sure the camera cue is running in QLab. Check all previous steps.
- press OK. You should now see your QLab output in the main OBS window.
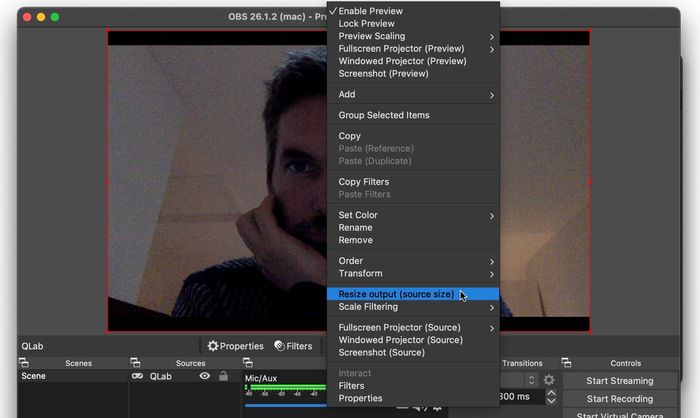
⚙️ If the QLab feed isn’t filling the preview window, right-click on the feed and select *Resize output (source size). This will make sure OBS is set to work at the dimensions of the feed from QLab. Most likely this will be either 1080P (1920 x 1080) or 720P (1280 x 720). In my case its 1280 x 800 because I was using my webcam here, but with the UltraStudio and a professional camera, it should be 1080P minimum.
To verify this, you can double check your surface size in QLab, then in OBS go to settings > video. The resolution should match the QLab value.
Now we’re just one step away from streaming from the stage to the world.
Next we’ll get a live-stream running to YouTube, and following that, Kevin Gleeson will cover how to add high-quality audio to your stream.
Streaming to YouTube #
Enough talking already, let’s stream! I’m going to keep this fairly high-level as you can figure the details of YouTube out for yourself.
Don’t forget YouTube won’t let you live stream immediately, you’ll need to wait for 24 hours 🙁, unless you’ve already done this.
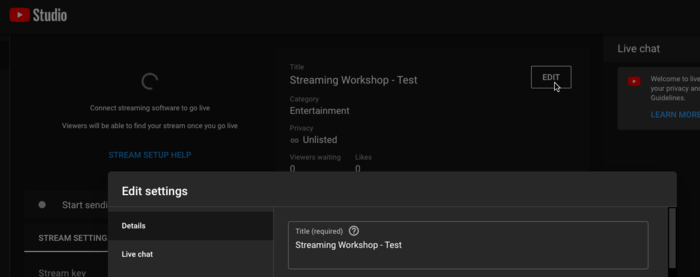
Assuming you’ve enabled live-streaming in your YouTube account, and the 24hours has passed, hit create and go live to open YouTube Studio.
Choose Streaming software as the method of streaming.

Make sure to go through the settings page before attempting to stream as it won’t work if you haven’t completed certain items.
Then, close settings and hit the copy button beside Stream Key

This is all you’ll need to stream from OBS to your YouTube account, so be careful not to share this key!
Next, open OBS and go to settings > stream. Choose YouTube - RTMP from the Service drop-down, and paste your Stream Key into the Stream Key field and press OK.
Start the stream #
Make sure you have an image in OBS - either run your camera cue in QLab, or drop a video clip into QLab and run that (you can set it looping from Time & Loops > Infinite Loop = True. A good source of free video clips is Pexels. I used this one from Pexels user Stef.
Now just hit Start Streaming within OBS, and you should see your QLab output in the YouTube Studio preview window a few seconds later.
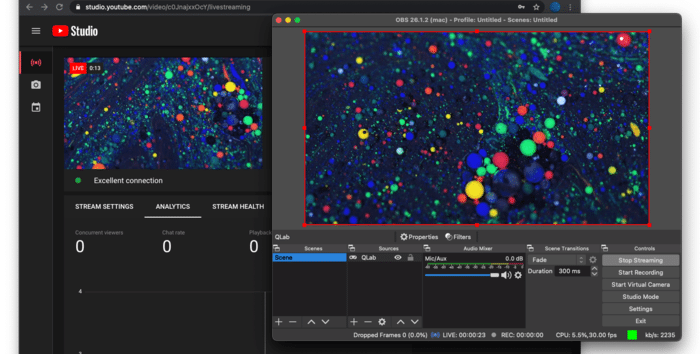
No viewers… nobody likes me 😢.
🛠 What if everything looks like it’s working but you don’t see video in the YouTube preview window? This is likely because something in the stream settings hasn’t been filled in. YouTube seems to be pretty poor at letting you know this. For me, I hadn’t completed the is this stream for children item, once I indicated it wasn’t for children, it worked fine.
Next up, adding high-quality audio to your stream.
Audio acquisition - from microphone to broadcast #
This section is contributed by sound designer Kevin Gleeson and he also covered this in the workshop.
To capture high-quality audio, we need an audio capture device that sits between our microphone and computer - usually called an audio interface or sound-card. This device converts an analog audio signal to a digital audio signal that we can send to the world over the web. An audio interface can also convert digital audio signals back into analog audio signals so that for example we can play a digital audio file through a speaker. Laptops have built in components with low grade audio peripherals such as the built-in microphone, stereo speakers and headphone out port. If we want our live performance to sound as good as it can, we need to capture the sound using one or more high quality microphones at appropriate positions to the performers which we digitally capture using our audio interface.
Audio interfaces #
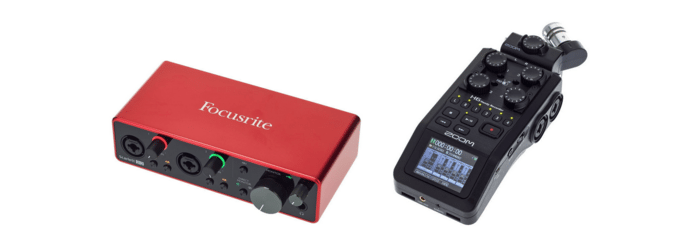
Consumer grade audio interfaces tend to have 2 inputs and 2 outputs such as the Focusrite 2i2. This means you can connect two microphones and also a pair of externals speakers or headphones to monitor the sound from the microphones or playback pre-recorded audio files. More advanced units can have dozens of inputs and outputs which you might find in professional recording studios allowing the engineer to multitrack record a band or orchestra. We will be using a ZOOM H6 field recorder as our interface in this tutorial. It has 6 ins and 2 outs. ZOOM recorders all can work as audio interfaces when connected to the computer using a USB cable and are very common.
Understanding how many ins and outs your interface has and how they are numbered is important later. You should check what type of cable you need and also make sure you have the correct adaptors if it uses a FireWire or Thunderbolt connection. Some of your inputs may have built in preamplifiers allowing you to gain up an incoming signal. Phantom Power may be available on some or all of your inputs which you will need when connecting condenser microphones.
If you have the option to gain up your incoming signals using a separate preamplifier or a channel on a mixing desk this would be recommended. Generally built-in preamps on audio interfaces are cheaply made and can have a relatively high noise floor which can introduce an audible hissing to your sound. You may also need to install a driver for the device which can be downloaded from the manufacturer’s website, although most new interfaces are plug-and-play meaning they will appear in your software as soon as you plug them in and won’t need to install anything extra to get them going.
Virtual Audio Interface #
In addition to hardware our audio interface, it is possible to create virtual audio interfaces within your computer which allow you to pass digital audio signals from one software application to another. Popular virtual interfaces include the likes of Soundflower, Audio Hijack and the incredibly powerful but overly complicated Dante by Audinate.
Mixlr AudioLink is a virtual audio interface which is included when you install the Mixlr App. Mixlr is another great piece of software in itself which allows you to broadcast live audio from your computer to your own website or personalised page on Mixlr.com. This super easy to use platform is great if you want to broadcast an audio-only performance such as a radio play or DJ set. Mixlr Audiolink is a no frills, stable and regularly updated virtual soundcard that comes with the Mixlr app and is the solution we will use. Download and install the Mixlr software after you make an account via their website. Mixlr AudioLink should now appear as an option in your list of audio devices via system preferences.
Aggregate Devices #
When you use a piece of computer software which makes use of the sound peripherals connected to your computer you may need to choose which audio devices you wish for the program to utilise. Some applications are limited in that they will only let you interface with one device at a time. This can be problematic if for example, you need to receive microphone signal into your computer from your interface but also send audio out through a Bluetooth speaker. It is possible to create a composite device by effectively glueing a number of audio devices together, virtual and physical, into an aggregate audio interface. We will need to do this in order to patch audio from our Physical interface to our virtual interface.
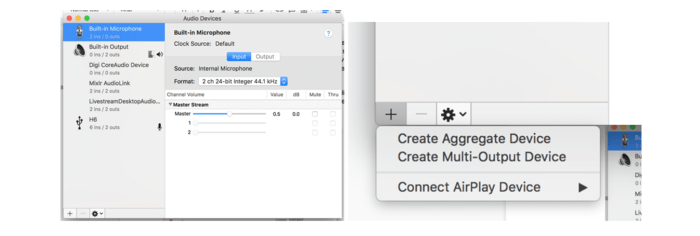
Hit Cmd+Space to bring up spotlight search. Search for ‘Audio MIDI Setup’ and click to open when the option appears. Sometimes when you open Audio Midi Setup the audio devices window is closed, so you may need to open it from the Window drop down menu in the menu bar. This window shows us a list of all available devices in the left-hand lane. Under each device name is an indication of how many Ins and outs each device has. Clicking on a device gives us more information and access to additional settings of said selected device. To create an aggregate device, click on the + sign in the extreme bottom left corner of the window and select ‘Create Aggregate Device’
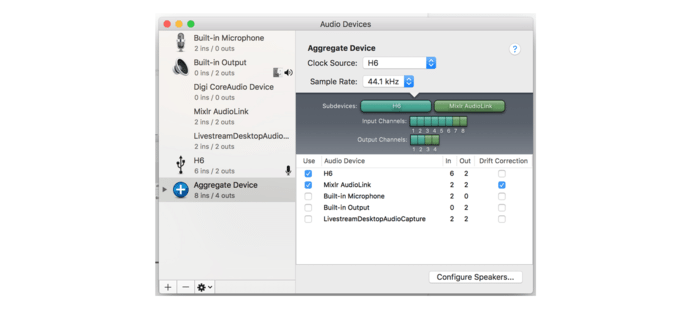
A new device appears at the bottom of the device list called ‘Aggregate device’. You can rename it by double-clicking on the name, but we will leave the name as is for now. We want to use our Zoom H6 to receive audio from our microphones, and we will be using the Mixlr AudioLink to patch audio from Qlab to OBS. To include these devices in our new Aggregate device we need to tick the boxes adjacent to these devices under the ‘Use’ column. Our new device now has a combined total of 8 inputs and 4 outputs.
In the dark grey area to the right we can see our sub-devices which are now colour coded. The H6 has been assigned the colour turquoise and the AudioLink a more natural green (thank you apple for deciding to use very similar shades of green here. So helpful!). We can see how channels are assigned by looking at the chain of coloured bricks underneath.
THIS IS VERY IMPORTANT! I recommend getting a pen and writing this out as a list. It will vary depending on what interface you are using and how many ins and outs your interface has. Input channels 1-6 are the H6 inputs and input 7 & 8 are the AudioLink inputs. Output channels 1 & 2 are my H6 outputs and output 3 & 4 are my AudioLink outputs. Confused yet?
Let’s look at this in a list for a little more clarity (AD = Aggregate Device)
- AD input 1 = H6 input 1
- AD input 2 = H6 input 2
- AD input 3 = H6 input 3
- AD input 4 = H6 input 4
- AD input 5 = H6 input 5
- AD input 6 = H6 input 6
- AD input 7 = AudioLink input 1
- AD input 8 = AudioLink input 2
- AD output 1 = H6 output 1
- AD output 2 = H6 output 2
- AD output 3 = AudioLink output 1
- AD output 4 = AudioLink output 2
We will never need to use the Audiolink inputs (AD 7&8), so our inputs are actually relatively straightforward. If I want to plug in four microphones I can connect them to the inputs 1, 2, 3 & 4 of my H6 and the numbers will correspond easily when we get onto QLab. For the outputting, if I want to send a sound to a pair of speakers or headphones I have the room I can connect them to the stereo output of my zoom and route sound out of channel 1 & 2 in Qlab. If I want to sound out to my livestream I will be using output channels 3 & 4 in Qlab. This will make more sense when we get on Qlab itself.
QLab settings #
We need to configure some audio settings in QLab.
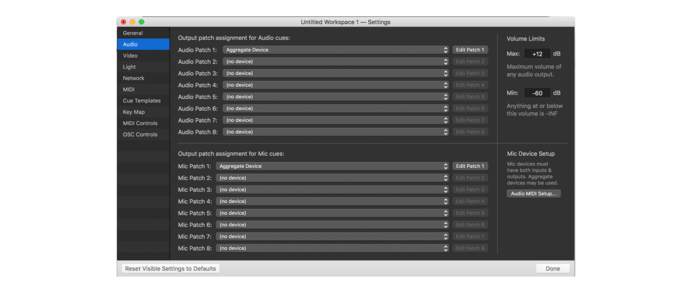
Click on the cog in the bottom right corner of your project to access the settings menu and click on audio in the left pane to view audio settings. The upper half of this window is to select the device output assignments for Audio Cues ie. the place we want to playback our prerecorded audio files. The lower half of the window is where we selected the output patch assignment for our microphone cues. One may ask why we bothered making an aggregate device when it is clear here that we can select multiple devices in any of the eight different audio patch options. The answer to this question is that there are several limitations to working in this way.
The main stumbling block for what we want to do is that if you select the H6 as the audio patch assignment for mic cues you can only output it to the outputs of the H6 and not to the AudioLink virtual interface. So we will use the aggregate device method of interacting between devices. You’ll notice in the lower right side of the window that the designers of QLab have even giving us a hint to do so. They must be aware of this limitation within the software which I think might have to do something with audio sample rate clocking between devices. Don’t worry about needing to understand this in great detail though. We’ll stick to our plan. Select Aggregate Device in both assignment for audio cues and assignment for mic cues as you can see in the image above. Select (no device) for all other patches.
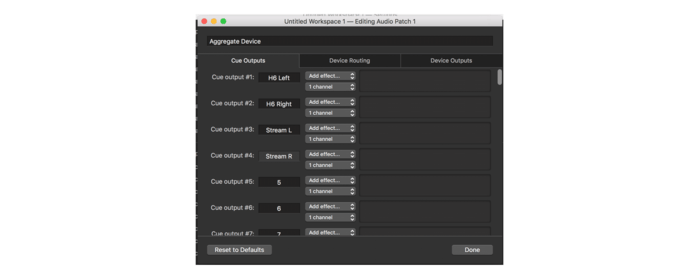
Let’s also name the output channels. Click on ‘Edit Patch 1’ to the right of where we have selected ‘Aggregate Device’ in Audio patch 1 of the ‘Output patch assignment for audio cues’ option. Which opens up this window:
Type in a name for each output in the text boxes as seen above.
If we check our Aggregate Device assignment list that we wrote down earlier we know that output channels 1 & 2 of our Aggregate device are our Zoom H6 physical audio interface outputs and Aggregate Device output channels 3 & 4 are our AudioLink virtual audio interface output channels. Our Outputs are occurring in pairs as we are dealing with stereo audio (2 independent channels of audio, one for the left ear and one for the right ear).
We have a H6 Left channel to send audio to our left speaker or headphone in the room and the H6 Right Channel to send our right speaker or headphone in the room. These will be used as our monitors so our actors and technicians can hear our playback. Stream L and Stream R is where we will send sounds that we want to go to our stream.
Now that we have named our Output patch assignment for Audio cues outputs, we need to do it all again for the Output patch assignment for mic cues. Use the exact same naming convention as we just did for the audio cues assignments. Now we are ready to make some noise! You can close the QLab settings window to take us back to the main Cue list.
QLab Mic Cues #
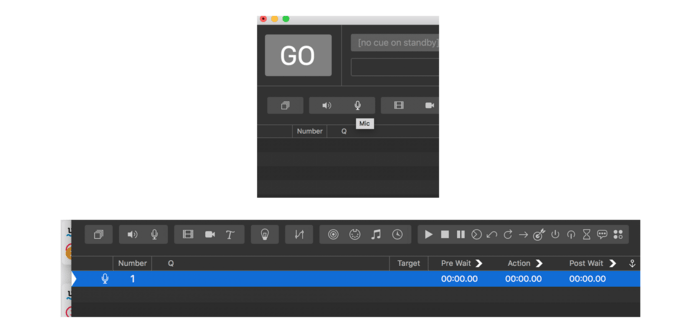
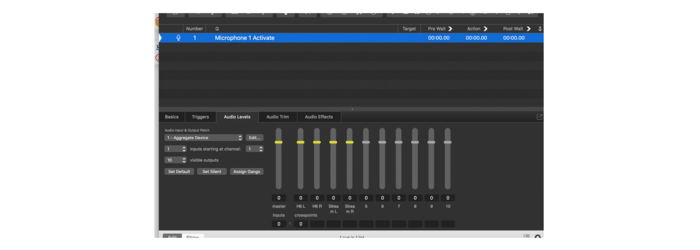
To create a mic cue, click on the microphone icon to the bottom right of the go button. A Cue will appear. This is a microphone Cue. Let’s name it Microphone 1 Activate. Double-click on the cue under the Q lane and type to name your Cue.
At the bottom of the window you will notice that we have five tabs which we can use to access different settings related to our Cue. Click on the Audio Levels tab to look at how our microphone cue is routed. You may need to make the window bigger to be able to see it all but you should see that we have a group of Adjacent horizontal faders. The left most fader is our master fader which controls the overall volume of this microphone cue.
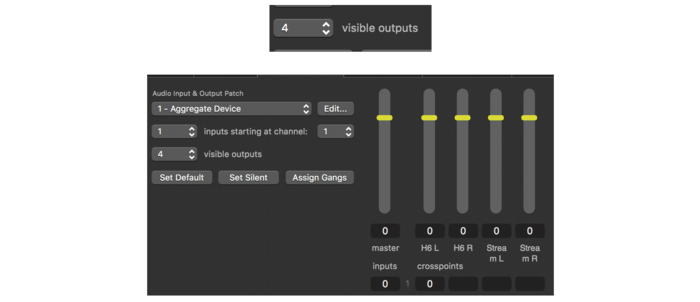
At the moment we see 10 faders to the right of the master fader. Change the value of visible outputs to 4 so we only see the 4 outputs we need.
Things are a little neater now. Notice that the names we assigned to the output channels earlier appear under the faders. Let us consider the inputs next. You will notice a text statement with variable values above the visible outputs option. It states (1) inputs starting at channel (1). A very cryptic way of choosing how we see our inputs but this is how the designers of the program have done it. Essentially what it is saying is “I will show you one input and I will start counting the inputs at input 1 on your device” i.e. “you will only see the first input of your device”. Let’s change this to say (2) inputs starting at channel (1).
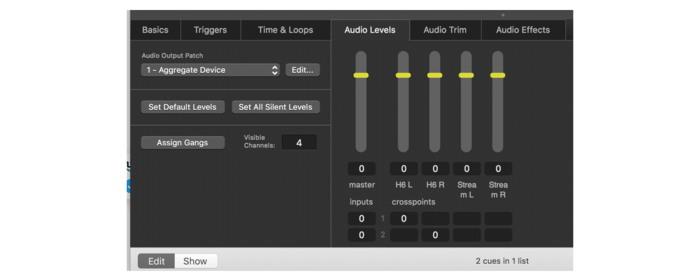
You will notice that we have a new line at the bottom of our window. Let’s talk about what’s happening down here.
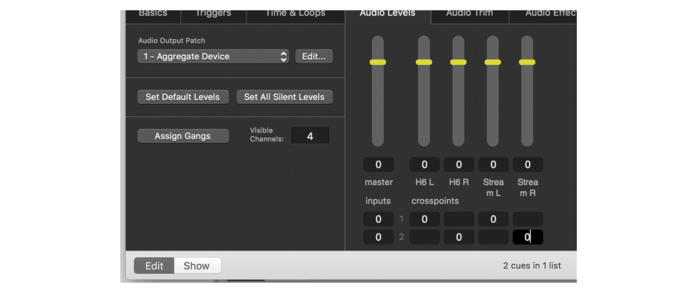
Underneath where you see the word crosspoints we have a matrix of boxes, some with zeros and some empty. To the left of this matrix we see a grey ‘1’ on the top line and a ‘2’ on the bottom line. We use this matrix to patch our microphone channels to our outputs. We need to place a zero in the box that intersects the input channel and the output fader to connect and input to an output. At the moment you will see that we have a zero in the box between input ‘1’ and output ‘H6 L’ meaning that the signal from the microphone connects to input 1 of our H6 interface is going to be sent to the left speaker in the room. Input 2 is going to the right speaker in the room as we have a zero in the box that intersects row ‘2’ and the H6 R fader.
Don’t feel too intimidated by all these boxes and zeros. Let’s go ahead and put a zero in all the boxes so that our 2 microphones are sent out both speakers in the room and both the Left and Right channels of our stream as in the screenshot below. This will send both our microphones to both speakers in the room and both left and right channels of our stream.
Click on our Cue in the Cue list above and hit the space bar. You will see a little green play symbol appear at the far left and underneath the Action lane we will see a timer has started to count the seconds since we have activated it. If you have speakers or headphones connected to the audio interface you should be able to hear the microphone signal coming through.
Let’s very quickly look at playing back an audio file. Navigate to a .wav or .mp3 audio file on your computer and drag it into the Cue list in Qlab. You can see below that I have added ‘Sad Flutes.wav’ which we can see is 2:16.43 in length.
Let’s quickly look at the routing for this by selecting the file and clicking the audio levels tab once again. Things look slightly different here than in our Mic Cues. I can select the number of visible channels and I will go ahead and select 4 once again. I don’t have the option to choose how many inputs there are because the audio file already has a fixed number of channels, in this case two; One left and one right channel. You will see that Channel 1 is already routed to output H6 L and Channel 2 is routed to output H6 R. If we highlight our Cue in the cue list above and hit the spacebar it should start playing out of our speakers or headphones in the room. It should be in stereo.
Now let’s route the signal to the Stream Left and Right outputs. Type a zero into the matrix where input channel 1 intersects Stream L and where input channel 2 intersects with Stream R. Let’s leave both the mic cue and the audio cue running and move on to getting sound into our streaming software. There is an option to infinitely loop the audio file, so it never ends in the Time & Loops tab, so we don’t have to keep retriggering it so go ahead and do this if you like.
Receiving sound in OBS #
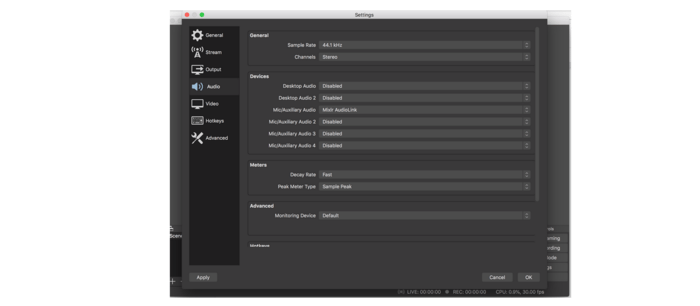
Thankfully we have done the heavy lifting by now. We only need to select our input device in OBS. Hit Cmd+’,’ to open the settings window. Under devices, select Mixlr AudioLink as our option in the Mic/Auxiliary Audio dropdown menu. Leave all other devices as disabled. Make sure not to select Aggregate Device here.
Exit the settings window. You will now see audio metering in our audio mixer dock in the lower part of the window. OBS is now receiving our audio from Qlab, and we are ready to stream our sound to the world!
On-stage #
Some on-stage practicals things to cover here - better ways to get video from your camera/s to capture device, and how to set up QLab for local video monitoring.
Cabling (or not)
At the beginning of the guide I suggested using a HDMI cable to get up and running, and that it might do for a very compact performance. However, in most cases you’ll want to use something that’s a bit lighter, more rugged and better suited to longer lengths to get you from stage to the wings or control room. Here are a couple of options:
Wired
If your camera has an SDI output, then you should definitely switch to SDI cable, a professional standard for broadcast and film, and is a better fit for stage use all round than HDMI. Plus, the UltraStudio Recorder already has an SDI input.
Wireless
This is now an affordable option for stage productions, especially if your production would benefit from a completely wireless camera. Check out the Hollyland Mars 400s costs around €550 for a complete kit, which is amazing for what it does. I’ve used one on a couple of productions with great success. Bare in mind you’ll also need to spend some money on high capacity batteries and charger etc. You can have a look at a Mars 400 based setup I used for Gulliver’s Travels(postponed) at The Unicorn Theatre.
Video Monitoring
While setting up QLab for sharing to OBS, we removed your main Mac display so the video output wouldn’t take over your local display. But what if you want to monitor QLab’s output on a separate monitor or multiple monitors? This is very easy - with an external monitor connected, simply edit the to_OBS surface, hit the + button and select your external monitor. Now QLab’s video output is being sent to both OBS (via Syphon) and to the external monitor.
If you need multiple video monitors for different crew members etc. use a HDMI splitter to split one feed into multiple outputs.
Appendix #
This guide covered a complete path to getting you up and running with streaming your production. However, I’m sure you’ll have questions about reliability, failovers, internet connectivity etc. I’ll touch on a few likely ones here:
- Microphone selection and noisiness
- The audience at home and their devices
- Is this approach production-ready?
- Reduce the risk of live-stream interruptions
- Using mutiple video cameras
Microphone selection and noisiness #
Generally in theatre we use microphones to boost. We can hear the actors acoustically in the space. If it is a large auditorium we can place speakers in places further away from the stage and route the sound to those places. If we want our show to have a lot of underscoring we can push the base level of the voices so that they sit above the music. When we livestream, the audience do not hear the actor in the room. This makes it important to consider what microphones we use and how we use them. Using an omnidirectional head mic such as a DPA 4066 or 4060 is effective in picking up an actor as well as a decent balance of ambient room sound, but we must take care. It can be a lot more unforgiving when listening to a raw microphone signal with a pair of headphones. EQing, compressing and gating a microphone can sound a lot less natural. Equipment noise and the movement of technicians in the room will easily be heard so be prepared to ask your technicians to take of their shows if moving and not to speak if possible. You might get away with a little humming from the air conditioning system in a real world performance, but it will be very noticeable in your stream. Also, the more mics you have open at once, the more noise you will have in your presentation. The more clever you are with how you program your mics activating and deactivating in Qlab, the fewer problems you will have with unwanted noisiness.
The audience at home and their devices #
People at home could be watching your performance in their home cinema or on their old Samsung phone with a dodgy speaker. We have to assume that some people will be listening to your sound in an unideal manner. Requesting to your audience to wear headphones is a good way to ensure that your audience will have access to most of the full spectrum of frequencies available at presentation. Often though people will want to watch your performance with others in their household so a lot of the time they might listen from the built-in speakers of their laptop. Not ideal that all of our low frequencies will have gone to waste. A pragmatic approach would be to mix your sounds loud and clear particularly in the mid-frequency range. Make sure to audition your performance on low-grade laptop speakers throughout the design process. Check that you are broadcasting loud enough that people have the necessary headroom in their devices to turn it up if need be but make sure you don’t clip and distort the output by sending too much signal. Consider using a limiter on the master output of QLab to control this.
Is this approach production-ready? #
My opinion - yes, but it depends on your production. 2020 was my first time to work on a live-streamed production, we based our solution for To Be A Machine - the one in this guide - on QLab’s own streaming guide here. We’ve streamed over 20 performances of the show this way with only one interruption, which we determined was a brief internet outage in the venue. We recovered from this and continued the performance, but after a longer delay than we would have liked. This was down to us not having a proper plan for these situations.
People and businesses that claim to be streaming specialists etc. will likely poo-poo the use of OBS - this has happened me. In my experience this comes from a place of them not knowing very much about how this stuff works and only trusting super expensive broadcast quality equipment and software, because that’s all they know.
That said, would I recommend this solution for live-streaming the EuroVision song contest? No. Should you use this for your small to medium theatre production that’s strapped for cash? I would, but it’s up to you! What if you only have a single performance, and an issue means 100% of your performances are lost? Then you need to understand that live-streaming over the internet is inherently risky no matter what you do. It’s never going to match the reliability of a live TV broadcast that have satellite uplinks and commercial 4G network connections at their disposal.
Reduce the risk of live-stream interruptions #
There are things you can do to reduce the liklihood of any issues being stage-side, and we’ll cover these below. Before that, it’s worth mentioning that guaranteeing perfect connectivity is next to impossible.
There are so many potential points of failure outside of your control that you just can’t guarantee it. It’s like if you had a power cut in a venue, but more opaque, because the internet is a complex network with many layers and organisations involved in keeping your link to your chosen service up and running. For example, have a look at YouTube’s outage records for 2020. You could have spent a fortune on a streaming setup and still not been able to stream your performance.
Have a plan #
Because of the inherently risky nature of a streaming connection, it’s really important to have a plan and a decision making process in place for what to do in the event of a live-streaming problem. You have to assume that you’ll have at least one major streaming interruption in your run of performances. It’s always amazing to see show-stopping event planning happening only after a show-stopping event happens! Even on larger, well-organised productions.
Especially important with a live-streamed performance, is having a way to communicate with your audience, quickly and efficiently. One really tricky thing here is that the only way to do this is via email, and quite often show are on when box-office is closed.
Internet connection! #
First and foremost, ensure that there’s a suitable internet connection available where you intend to stream from. Here is a good guide about what to look for from Restream, a service I’ll mention again below. Important bits:
- for a 1080p stream (likely for you), you’ll need an upload connection of 7.4 Mbps. To be honest, this seems on the low side in terms of comfortable headroom, I’d relax if I saw upload speeds of 15Mbps. If you have a fibre connection at home you’ll see upload speeds of this and much higher.
Now here’s the thing, a venue might have a connection that matches these requirements, and you verify it with a basic speed test. However, you have no idea what happens to your streaming data in the building before it heads off into the aether. I personally haven’t done enough to check this out, and I don’t think I’d know exactly what to look for, and there might not be time or opportunity. So I’d also recommend running a long ping test from a terminal:
- run terminal application on your Mac
- type
ping www.google.ie - your computer will ‘ping’ Google’s servers repeatedly, leave this for 15 mins or so. Then hit
CONTROL + Cto stop the process. - check the results at the bottom. Ideally, you’ll have 0.0% packet loss and a very low round-trip standard deviation, below 10 milliseconds.
This might help expose any issues that a basic speed test won’t. It also might suggest that your connection is passing through some incorrectly configured network gear in the venue.
Bonded internet connection #
This is where multiple independent internet connections are cleverly merged together and presented to your computer as a single internet connection. The main reason for doing this is to produce a faster connection from two or more slower connections, e.g. a remote location with poor infrastructure etc.
The other advantage of this is it can increase the reliability of the connection by spreading it across multiple connections. So does this mean you used an internet connection using two bonded connections from two separate providers, that if one went down you’d keep streaming? In theory, but of couse each individual connection would need to have an upload speed fast enough to sustain a reasonable quality stream.
I want this, how can I do it?
DIY approach. In this spirit of this guide, I’ll quickly share an approach that I’d like to try soon, and one that could slot very nicely with the rest of this solution. Use a software bonding app to bond a wired connection in your venue with a 4G connection from a dongle. This is what Speedify claims to do and this could be a great low-cost DIY solution, if it does what it promises. I will test this and update here.
Remote / outdoor solution
Teradek make this military-looking mobile bonding unit that’s worth taking a look at if you plan on streaming from that cool abandoned factory on the docks. I’m sure there are cheaper options out there now that you know what they’re called.
Hire a company to do it for you
They’ll likely provide you with one of these LiveU units, set it up for you and charge you loads of money, which should be fine depending on who’s doing it. One tip would be to insist on it being set up as an internet connection and not a video / audio input that streams direct to YouTube, Vimeo etc. We found that when set up as a video / audio input, it was doing all sorts of weird things with video colour and audio compression.
Using multiple video cameras #
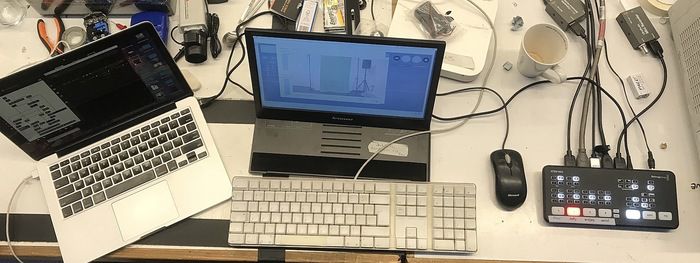
Quick answer - use a vision mixer / switcher upstream of your video capture device. A good option for low-budget productions is Blackmagic’s ATEM Mini. I have another guide on using it with multiple cameras here.


